Almost from the beginning of the cabin decorating process,
I knew I wanted our room to have a wood pallet headboard. I wanted
our room to have a more rustic feel to it, especially since that style
doesn't work in our own house. So everything that I've done up to this
point has been done with a pallet headboard in mind.
(click HERE for the previous post about our cabin bedroom)
(click HERE for the previous post about our cabin bedroom)

I found some inspiration pictures on Pinterest to help figure
out what to do. While ours didn't turn out exactly like any
of these three, they helped me figure out what I wanted.


I knew this was a project that my husband would need to help me with,
and luckily, he liked this headboard idea, so it wasn't too hard to talk him
into helping me. He was able to get a ton of pallets for free... BUT this still
ended up being an expensive project, because Isaiah bought two power tools
to complete it (I think it was a good excuse for him to purchase new "toys!")

Anyways, Isaiah first tried to pry the pieces of wood off the pallet with a
crow bar, using force. That was NOT the right way, because the wood
would just split every time. So he used a sawzall to cut the nails away
from the wood. This approach worked very well. We decided it would be
easier to sand the entire pallet before disassembling them with the sawzall.
As Isaiah removed the planks, he set them next to me to stain.

Now, there's so many different things you can do to treat wood to change
the appearance of it. I found something online that looked pretty easy, and
it seemed like it would just age the wood, giving it a rustic look. I'm sharing
the screenshot from a website that I used to show what we purchased and the
instructions for it (don't mind the text message alert from my sister at the top haha!).
You just brush on with a flat paint brush, then use an old rag to wipe the excess off.

In the picture below, the top board has been
treated with the glaze. The bottom board is one that
is untreated. What a difference!

Since all the pallets were made from different kinds of the wood, the glaze
didn't look exactly the same on each piece. Isaiah kept reminding me that
we were going for "rustic," which he equates with "imperfect," which isn't
really a word in my vocabulary! But as it turned out, I'm glad they looked
slightly different.... I think it's more interesting that way.
**Please don't judge how messy our garage is**

The ceilings in our room at the cabin are sloped, but on the wall the bed is on,
it's about 12 feet tall (I believe!). I wanted the headboard to be the focal
it's about 12 feet tall (I believe!). I wanted the headboard to be the focal
point in the room, so it really needed to be taller than the average headboard-
I decided it should come up about 8 feet in the room. That meant that it
needed to be about 6 feet tall, since it would start a few inches below the mattress.
needed to be about 6 feet tall, since it would start a few inches below the mattress.
Isaiah laid out pieces of wood as a rough "frame" for me to design the wood
headboard pieces. We only had 3 planks that were 5 feet long, so I spaced those
out on the headboard, with one of them being at the very top. Then I had to find
pieces that were similar in height to each other to combine in each row.
I used a variety of combinations - 3 pieces to a row, 2 pieces to a row, some met
in the middle, etc. Kind of like organized chaos - I didn't want it to look like
it was a pattern, but I also didn't want to have two similar rows next to each other.

After I got done doing this, Isaiah cut the pieces to fit. He used the top plank that was
5 feet long as a guide to getting the other rows to be even. Please take some time
to appreciate one of Isaiah's newest power tools!


Then, it was time to nail. I'm not sure exactly how he did it,
but he used spare boards as a backing to the headboard to nail
each piece in. We didn't have any boards that were as tall as we needed,
so he had to improvise to extend the boards with more wood.
This part actually went a lot faster than I thought it would!

I would hand Isaiah the pieces in the order that they needed
to be nailed in to help the process go a little faster.

Here is the semi-finished product....

Because the wood planks aren't perfect, there were a couple places in the
headboard that you could kind of see through. Isaiah put spare pieces of
wood behind those places to kind of cover them up.
The nails were too long and stuck out the back of the headboard. We
easily snipped these off using pliars, and hammered them sideways to the
headboard so they wouldn't ruin the wall.

So over the weekend, Isaiah took the headboard up to the cabin. I couldn't
go because I was throwing a bridal shower (post about that to come soon!)
My husband sent me this picture of his design addition to the headboard...
not gonna lie... I was a little nervous that he was serious!!!

not gonna lie... I was a little nervous that he was serious!!!

I wasn't planning on the lights going up over the weekend, but
my husband and brother-in-law don't mess around! I decided to
get sconces for both sides of the bed instead of lamps. There isn't
room for a nightstand on the left side of the bed (well, when the
closet doors get added, there won't be room when the doors are
opened-there's only about a 7 inch depth). Eventually, the plan
is for the sconces to be on a dimmer switch, but for right now, it's not.
My husband tried to explain the technical side of why they couldn't
do it this weekend - but my summary of it is, "It's not on a dimmer switch
now, but it will be one of these days." On a side note, just look at all these
tools on the WHITE bedspread-I about died when Isaiah sent me this picture!

I didn't even instruct Isaiah on where to put the switch, but he put it
exactly where I wanted it-beside the bed! Or maybe that was his sister's
suggestion/decision? Either way, I was happy! It might seem like a weird
place for a light switch, but I wanted it next to the bed instead of at the door.
Since we are using the sconces in lieu of lamps, I wanted the switch to be
in a convenient location so we could use them the same way lamps are used -
basically, I want to be lazy and not get out of my bed to turn the light on/off!
I've got an idea or two of how to hide the light switch with it still
being easy to acces, but not sure what will actually work.
A big THANK YOU to my brother-in-law, Mark, for helping us with
this project... and the only thing he is "charging" me is a Sopapilla
Cheesecake! Pretty good trade off, in my opinion!
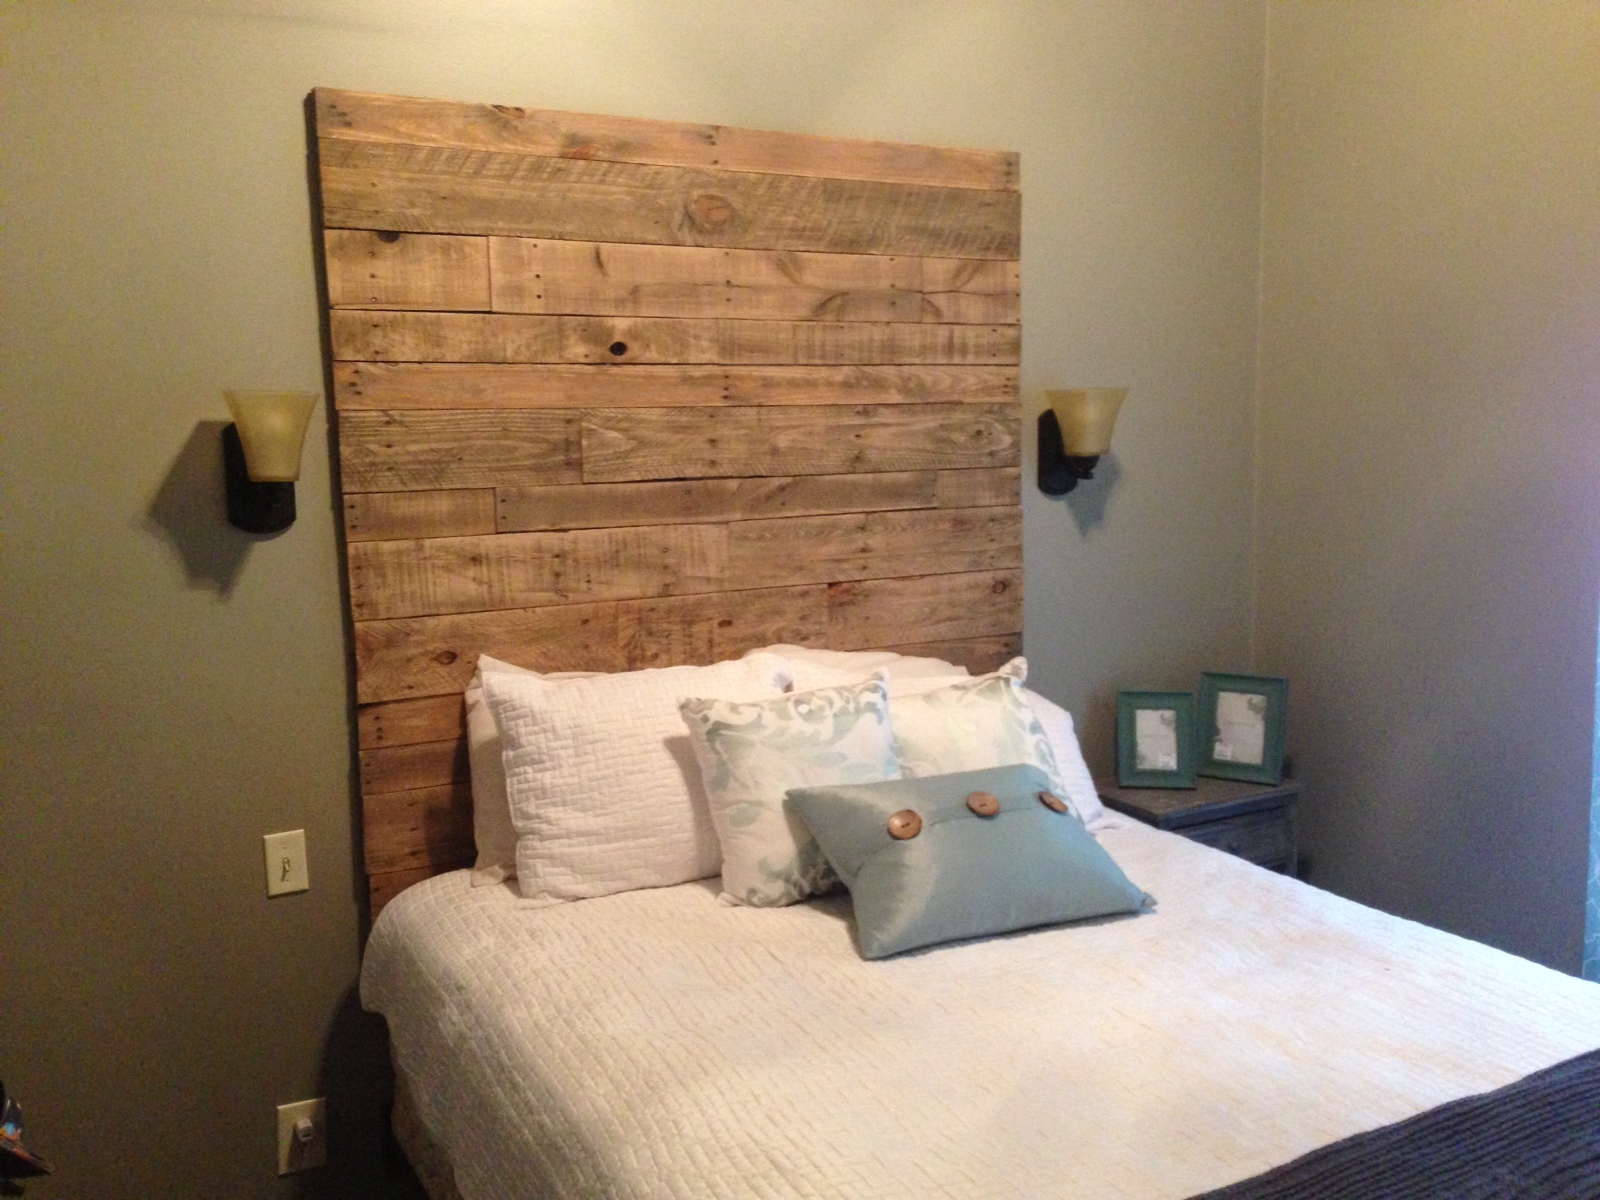
Lights off....

Lights on....

Hoping to make some more progress on the room in the
next couple weeks.... stay tuned =)
my husband and brother-in-law don't mess around! I decided to
get sconces for both sides of the bed instead of lamps. There isn't
room for a nightstand on the left side of the bed (well, when the
closet doors get added, there won't be room when the doors are
opened-there's only about a 7 inch depth). Eventually, the plan
is for the sconces to be on a dimmer switch, but for right now, it's not.
My husband tried to explain the technical side of why they couldn't
do it this weekend - but my summary of it is, "It's not on a dimmer switch
now, but it will be one of these days." On a side note, just look at all these
tools on the WHITE bedspread-I about died when Isaiah sent me this picture!

I didn't even instruct Isaiah on where to put the switch, but he put it
exactly where I wanted it-beside the bed! Or maybe that was his sister's
suggestion/decision? Either way, I was happy! It might seem like a weird
place for a light switch, but I wanted it next to the bed instead of at the door.
Since we are using the sconces in lieu of lamps, I wanted the switch to be
in a convenient location so we could use them the same way lamps are used -
basically, I want to be lazy and not get out of my bed to turn the light on/off!
I've got an idea or two of how to hide the light switch with it still
being easy to acces, but not sure what will actually work.
A big THANK YOU to my brother-in-law, Mark, for helping us with
this project... and the only thing he is "charging" me is a Sopapilla
Cheesecake! Pretty good trade off, in my opinion!
Lights off....
Lights on....

Hoping to make some more progress on the room in the
next couple weeks.... stay tuned =)

0 comments:
Post a Comment