CLICK HERE FOR FREE BLOGGER TEMPLATES, LINK BUTTONS AND MORE! »
Showing posts with label Room Decor. Show all posts

Wednesday, October 30, 2013

Halloween Decor... & Some Pumpkin Painting

This is the first year I've ever put out
any fall/Halloween decorations INSIDE my
house... I didn't go all out or anything, but
I really like the little bit that I did! It's a good
start anyways, and I think I'll just keep adding
to it each year, because I kinda like it!  
 
I already had the black stands and orange burlap.
I found the candle at Marshall's, and the owl and
pumpkins came from Big Lots! I couldn't believe
what cute stuff they had there!! While I like everything
that's on the table, I still think it's missing something...
But at this point I will just wait til next year to add to it.
I really like the mixture of the white, silver and black items.
 
I found this cute little towel at Target for $1... you can't
get much better than chevron and polka dot pumpkins!
 
For one of the guest bathrooms, I found
this adorable hand towel from Target.
The glittery pumpkin is also from Big Lots.
And this is one of the printables that I shared
last year (click HERE). I'm loving it!!

The second guest bathroom is decorated more for fall than
for Halloween... and I only just added a multi color pumpkin
(another find from Big Lots). It's the same colors that the bathroom
is done in, so it really looks perfect in there. I like it =) 

So that about sums up the inside decorating that
I did this year.... not a bad start, right?!?
 
The rest of this doesn't have anything to do with decorating,
but I'm adding it because it all happened around the same time.....
 
We had some friends over for Sunday lunch a couple weeks
ago. I grabbed plates, napkins, and cups from Target for $1
each, and the bowls and straws from the dollar store.
 
I borrowed this burlap pennant from our church (one of the
many random but useful things that I'm glad was donated
to the church...  instead of just throwing it away).
 
I made potato soup (click HERE for the recipe) & cheesy
crescent rolls. One family brought delicious pumpkin
 pie, and another family brought appetizers - pepperoni
chips, perogies, and sausage dip/chips! Yum Yum!
 
There were four kids that came over with their parents,
so I got the supplies for the kids to paint and decorate their
own pumpkin. It entertained them and was a really easy
setup... I got a couple plastic tablecloths from the dollar store
and put one on the floor and one over the table. I set out
paint, eyeballs, poms, glitter, and glue and let the kids have at it!
 
They had fun and so did I.... but the pumpkin I painted ended
up looking more like an Easter egg... wrong holiday, Rachel.
 Happy Halloween!!!

Friday, August 9, 2013

Living Room Decor... Finally!

My husband and I have owned our home a little
over 3 years, and I finally got around to decorating
our living room! Even though it's not completely
done, I'm probably not going to do anything else to it
for a while because I'm kinda sick of working on it!
 
Some things I knew before I decided to decorate this room:
I knew that I was keeping my curtains (they were custom
ordered to fit the large window not too long ago, so I knew I
wouldn't be changing those any time soon!!). I also needed to
keep the piano, because it doesn't work in any other room in the
house. I already had 2 lamps that I love, so I wanted to make sure
they would be used. I also kept a mirror that my husband bought
for us - it's a little fancier than I was wanting for the room, but
maybe later on down the road, when I decide to finish the room,
I will switch that out. I also knew that the paint color would not be
changing - we had the whole house professionally painted a couple
years ago, so it just hasn't been long enough to get our money's worth!
 
So I really just had a very hard time making any decisions
when it came to this room. I just couldn't figure out where to
start - that's probably why it's taken me over 3 years!
 So, thankfully, my friend Bethany came over and helped me
figure out what to do in the room. She's just VERY good at this
kind of stuff, and was a huge help! She gave me some suggestions
of what to do in the room, and ideas of what to purchase. She also
had me "stage" the room with stuff I already had to get an idea of
the spacing in the room. So that's what I did below.
 
The white leather furniture pictured above is now at our family
cabin and works perfectly there. But at the time, I arranged the
couch and loveseat in the dimensions of a sectional that I found to
see how it would fit in the room. I'm kind of embarrassed for you to
see the gallery photo wall that I attempted a couple years ago - the
arrangement of the frames isn't good at all, and I never put a single photo
in any of the frames! The frames are also fancier than what I really wanted
to do in the room, so I knew I'd be coming up with something different!
And seriously, the fake ficus tree. What was I thinking?!?
 
The first thing that I found for the room was 2 large matching
canvas paintings. They were on clearance at Pier 1 Imports.
I needed tall pictures because our ceilings are tall in the living
room. I also didn't want any fancy artwork because I wanted
the room be feel comfy and laidback. They incorporated
enough color too, and that's something that I really needed.
 
So this next picture gives me a huge headache... there is so
much stuff going on in here and NONE of it works together!
But seriously, things usually look worse before they look better
when I'm in the process of redecorating. I bought SO MUCH
stuff, tried it in the room, then took it back. But I think I took this
picture because it was a low point for me with the room!!!
 
 I had attempted to see what a dark sofa would look like
by putting a brown blanket over the white furniture - yeah, that
didn't really help me at all! But I trusted Bethany, and she said
that a dark brown sectional would work well in the room.
So, here's the sectional we ended up with:
 
My husband helped me hang the pictures from Pier 1
over the sofa. Then I decided to stage some more.  I tried
out another rug, and brought in a coffee table, end tables,
and an ottoman from my family room and 2 kitchen chairs
 to see what might work in the living room.  The ficus tree
even found its way to another place in the room....

 
I actually liked the rug, but it was just too busy with the
pictures we hung. So we decided to go without a rug at all.
If this room had hardwood floors, we definitely would have
gotten a rug, but since it's carpet, it didn't really need one.
 
I also decided that an ottoman instead of a coffee table
would be the better choice for the room. The sofa actually
had a matching ottoman available, but it did not include any
storage. So I found this ottoman at Home Goods, with storage.
It's not an exact perfect match to the sectional, but it's so close!
I added a blanket to the ottoman, and I think it helps disguise the
fact that they aren't exactly the same color. The ottoman also
included a tray that can be used for drinks or whatever else.
 
I wanted a couple chairs in front of the window to help
finish out a conversation area. I originally had wanted
fabric chairs. I found the ones below at TJ Maxx. But when
I got them in the room, they were just too small compared
to the sectional. And I couldn't find any larger fabric chairs
that I liked (print-wise, color-wise, and price-wise). 
 
So I changed directions and looked at leather chairs. I found one with
the same nailhead trim as the ottoman. I added a light colored throw
and a pillow, and I think it softened up the chair enough to use it. BUT...
I decided that I needed another one right next to it! It took quite a few
phone calls to multiple stores to get the same chair (it was on clearance and
could not be ordered). It was also a pain to find another identical blanket
(I called 7 TJ Maxx stores in 2 states), but I found it! 
 
I considered putting colorful pillows on the sectional, and maybe
I still will. But for right now, I like that the light colored pillows
seem to make the sectional not so "heavy." I already had the
checkered ones and the light green swirled ones. I found a couple nailhead
pillows at Target, and thought that it helped tie in the nailhead trim on
the ottoman and chairs.

 
To replace the previous, ornate gallery wall, I decided to make
a small grid using 6 identical frames that I found at Target.
I didn't have hardly any wedding pictures displayed in our home,
so I ordered 8x10 sized photos to go in the frames. At first I was
nervous that the pictures would be too big, but I'm so glad I didn't
go any smaller than 8x10.  Because the room is so big, anything
smaller wouldn't have had much of an impact in the room, in my opinion.
Once we have kids, I'm sure the photos will be switched out
with pictures of them - but until then, I love having these displayed.
 
There was some space left on the wall that the larger part of
the sectional is on... it wasn't big enough to put another piece of
furniture, but it was too big to leave blank. So I bought 11x14 sized
frames in the same finish as the wedding picture frames and hung them
in a column. My husband took a trip to Utah this summer, and he took
some beautiful pictures - so we chose 3 of them, had them printed at
Wal-Mart.com, and they look stunning! It's definitely my favorite
part of the room! I also found some red twigs 6 feet tall that worked well
in a vase in the corner. It adds a little bit more color in the room too. 

Finding end tables that I liked wasn't easy. I found one that
I liked - it's fairly small, the top of it is interesting without
competing with the lampstand, and there is a shelf on the bottom
to store things, with the option of putting a basket underneath.
It also has rounded edges - and knowing that we want kids some day,
this was something that I purposefully looked for.  Only problem - I could
only find ONE! I bought it, and decided to use a table that we already had
at the house as the other end table. And I'm kind of OK with the fact that
I don't have matching end tables. But, if I get serious about finishing up
this room, I will probably look for the same table again.

 
The other side of the room definitely still needs more work.
This is the side that the mirror and piano is on. The mirror was
originally hung with the white leather couch underneath it. When
I decided to get a sectional, we had to move the piano under the
mirror, and now the mirror is a little lower than I would like. But the
mirror is actually very heavy, so it's going to be such a hassle to raise
it up just a little bit, so I decided it would be fine where it is, for now. 
I'm probably going to change the mirror one day anyways, so when I
change it up, I will get to hang it how I want it! Plus, the piano is my
sister's, so the day that she is ready to have it back, I will have to get
something else to go in that spot anyways. So this is a temporary look.
 
Originally, I thought I would put a chair in the corner by the piano.
That was before I picked out the leather chairs to go in front of the
window. But I ended up putting an accent table there instead. I already had
the table thinking I would use it with the leather chair... but the table is too
big to go beside the leather chairs. I needed something beside the
piano, so it worked.  I added a couple candlesticks that used to be in our
bathroom, and a small wedding picture I already had framed. I still think
I need something on the walls on both sides of the mirror,
but haven't found anything I am pleased with yet.

So that's it! I'm pretty pleased with how it's turned out
so far... and even though I'm not finished, I can't bring
myself to work on it anymore for a while! I did all of this in
about 2 weeks - maybe it sounds like plenty of time to you,
but that's a ton of looking, comparing, buying, staging, deciding,
returning, and buying some more!!!


Monday, July 29, 2013

Cabin Bedroom Part 2 - Wood Pallet Headboard

Almost from the beginning of the cabin decorating process,
I knew I wanted our room to have a wood pallet headboard. I wanted
our room to have a more rustic feel to it, especially since that style
doesn't work in our own house. So everything that I've done up to this
point has been done with a pallet headboard in mind.
(click HERE for the previous post about our cabin bedroom)
 
I found some inspiration pictures on Pinterest to help figure
out what to do. While ours didn't turn out exactly like any
 of these three, they helped me figure out what I wanted.
 
I knew this was a project that my husband would need to help me with,
and luckily, he liked this headboard idea, so it wasn't too hard to talk him
into helping me. He was able to get a ton of pallets for free... BUT this still
ended up being an expensive project, because Isaiah bought two power tools
to complete it (I think it was a good excuse for him to purchase new "toys!")

Anyways, Isaiah first tried to pry the pieces of wood off the pallet with a
crow bar, using force. That was NOT the right way, because the wood
would just split every time.  So he used a sawzall to cut the nails away
from the wood. This approach worked very well. We decided it would be
easier to sand the entire pallet before disassembling them with the sawzall.
As Isaiah removed the planks, he set them next to me to stain.
 
Now, there's so many different things you can do to treat wood to change
the appearance of it. I found something online that looked pretty easy, and
it seemed like it would just age the wood, giving it a rustic look. I'm sharing
the screenshot from a website that I used to show what we purchased and the
instructions for it (don't mind the text message alert from my sister at the top haha!).
You just brush on with a flat paint brush, then use an old rag to wipe the excess off.
 
 
In the picture below, the top board has been
treated with the glaze.  The bottom board is one that
is untreated.  What a difference! 

Since all the pallets were made from different kinds of the wood, the glaze
didn't look exactly the same on each piece. Isaiah kept reminding me that
we were going for "rustic," which he equates with "imperfect," which isn't
 really a word in my vocabulary! But as it turned out, I'm glad they looked
slightly different.... I think it's more interesting that way.
**Please don't judge how messy our garage is**
 
The ceilings in our room at the cabin are sloped, but on the wall the bed is on,
it's about 12 feet tall (I believe!). I wanted the headboard to be the focal
point in the room, so it really needed to be taller than the average headboard-
I decided it should come up about 8 feet in the room. That meant that it
needed to be about 6 feet tall, since it would start a few inches below the mattress.
 
Isaiah laid out pieces of wood as a rough "frame" for me to design the wood
headboard pieces.  We only had 3 planks that were 5 feet long, so I spaced those
out on the headboard, with one of them being at the very top. Then I had to find
pieces that were similar in height to each other to combine in each row.
I used a variety of combinations - 3 pieces to a row, 2 pieces to a row, some met
in the middle, etc. Kind of like organized chaos - I didn't want it to look like
it was a pattern, but I also didn't want to have two similar rows next to each other.
 
After I got done doing this, Isaiah cut the pieces to fit.  He used the top plank that was
5 feet long as a guide to getting the other rows to be even. Please take some time
to appreciate one of Isaiah's newest power tools!
 
 
Then, it was time to nail. I'm not sure exactly how he did it,
but he used spare boards as a backing to the headboard to nail
each piece in. We didn't have any boards that were as tall as we needed,
so he had to improvise to extend the boards with more wood.
This part actually went a lot faster than I thought it would!
 
I would hand Isaiah the pieces in the order that they needed
to be nailed in to help the process go a little faster.
 
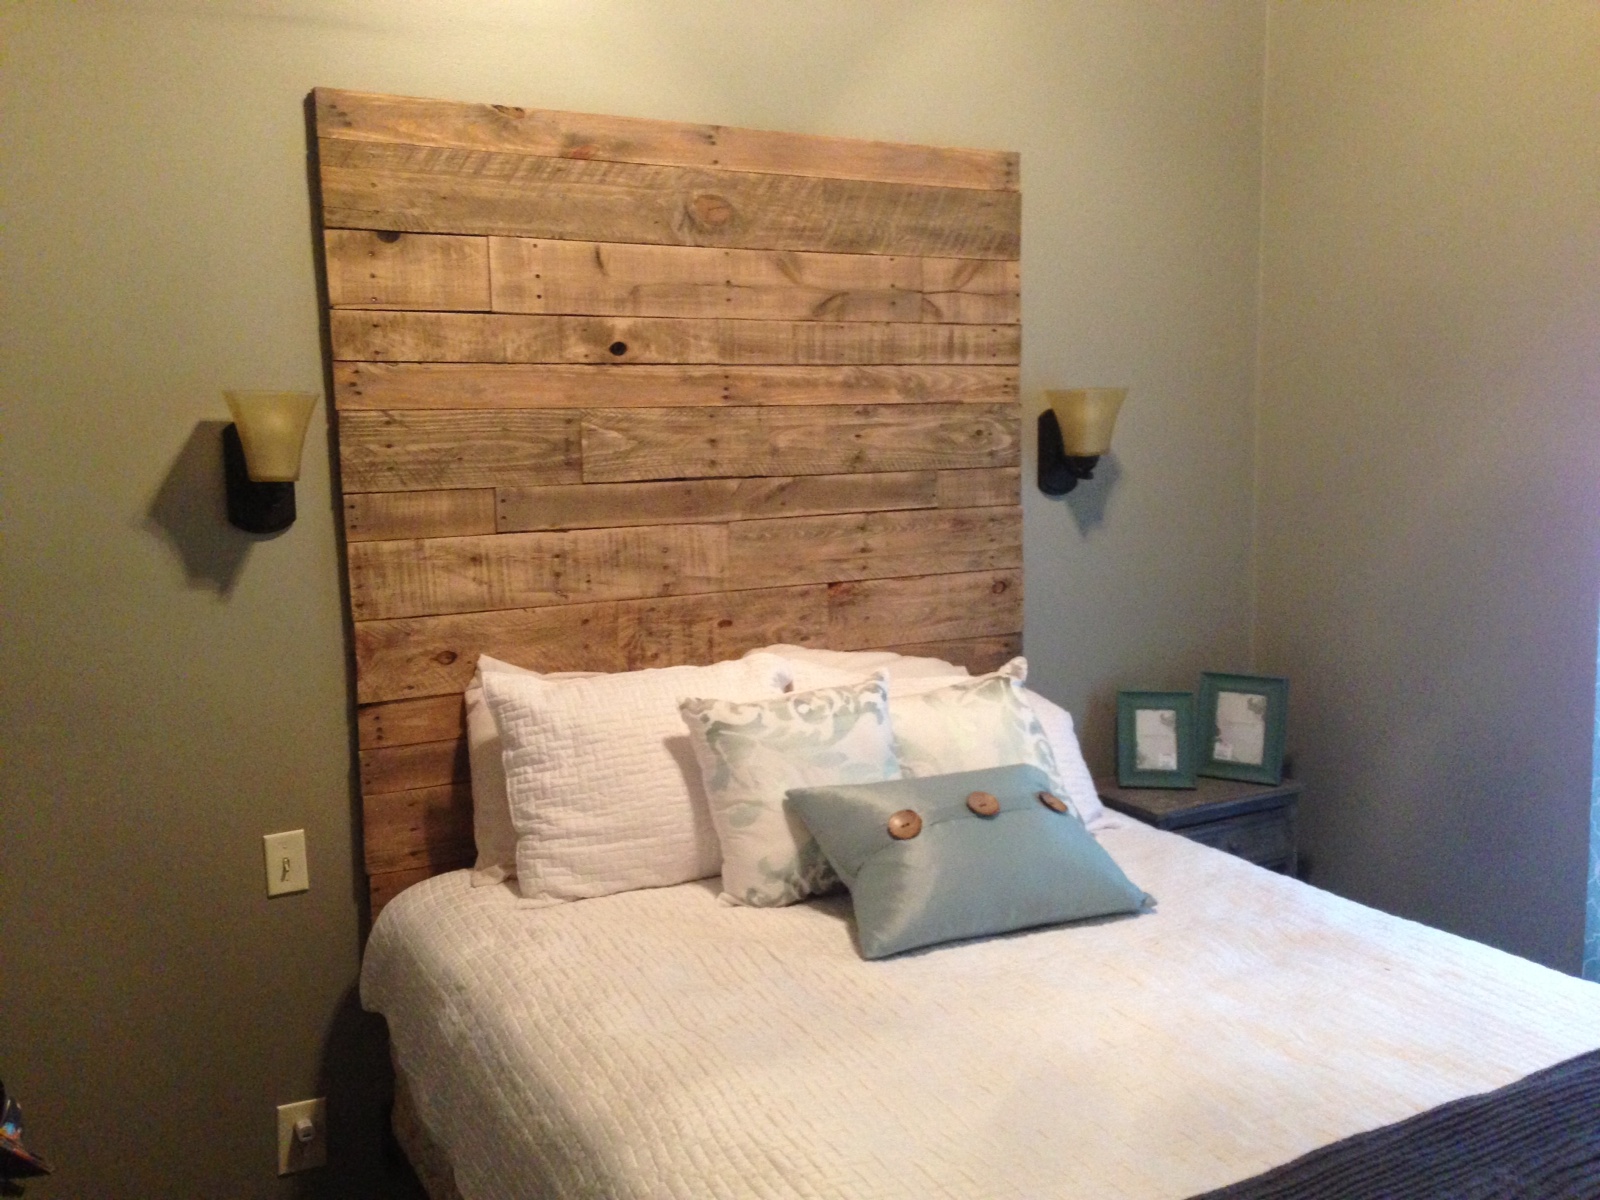
Here is the semi-finished product....
 
Because the wood planks aren't perfect, there were a couple places in the
headboard that you could kind of see through. Isaiah put spare pieces of
wood behind those places to kind of cover them up.
 
The nails were too long and stuck out the back of the headboard. We
easily snipped these off using pliars, and hammered them sideways to the
headboard so they wouldn't ruin the wall. 

 So over the weekend, Isaiah took the headboard up to the cabin. I couldn't
go because I was throwing a bridal shower (post about that to come soon!)
 My husband sent me this picture of his design addition to the headboard...
not gonna lie... I was a little nervous that he was serious!!!
 
I wasn't planning on the lights going up over the weekend, but
my husband and brother-in-law don't mess around! I decided to
get sconces for both sides of the bed instead of lamps. There isn't
room for a nightstand on the left side of the bed (well, when the
closet doors get added, there won't be room when the doors are
opened-there's only about a 7 inch depth). Eventually, the plan
is for the sconces to be on a dimmer switch, but for right now, it's not.
My husband tried to explain the technical side of why they couldn't
do it this weekend - but my summary of it is, "It's not on a dimmer switch
now, but it will be one of these days."  On a side note, just look at all these
tools on the WHITE bedspread-I about died when Isaiah sent me this picture!

I didn't even instruct Isaiah on where to put the switch, but he put it
exactly where I wanted it-beside the bed! Or maybe that was his sister's
suggestion/decision? Either way, I was happy! It might seem like a weird
place for a light switch, but I wanted it next to the bed instead of at the door.
Since we are using the sconces in lieu of lamps, I wanted the switch to be
in a convenient location so we could use them the same way lamps are used -
basically, I want to be lazy and not get out of my bed to turn the light on/off!
I've got an idea or two of how to hide the light switch with it still
being easy to acces, but not sure what will actually work.

A big THANK YOU to my brother-in-law, Mark, for helping us with
this project... and the only thing he is "charging" me is a Sopapilla
Cheesecake! Pretty good trade off, in my opinion!

 Lights off....

Lights on....

Hoping to make some more progress on the room in the
next couple weeks.... stay tuned =)

Monday, July 22, 2013

Cabin Bedroom Part 1 - The Bare Bones

My husband and his side of the family are building a cabin
on Summersville Lake in West Virginia. It's to the point
now where I get to decorate... so of course, that's what I'm
excited about doing! I'm going to do a series of posts about our
bedroom at the cabin, but it'll be a little while before it's "finished."
Especially since I am the queen of changing my mind...
 
So for now, I'm sharing what I consider the bare bones of the
room.  While the square footage of the room is pretty small
(about a 10x12 ft room), the ceilings are very tall, so it
really does make the room seem bigger.
 
I chose Benjamin Moore's Rockport Grey paint color for
the walls. The ceilings and floors are the same as the rest of
the cabin - hardwood, stained walnut I believe.


Since I picked the paint color without having anything else
picked out, I set out looking for something to be an inspirational piece
for the room that would coordinate with the paint color. I didn't have
a paint swatch of any kind, but I pulled the color up on my phone
to kind of help me see what would coordinate. I found these pillows
that had a mixture of blues and green's, and these curtain panels that
looked good together. The colors were soothing and a great balance
of not-too-girly-but-not-too-manly.
 
Curtains up close
 
I actually bought 2 white quilt sets and 1 gray quilt set to see what
I would like best in the room. I ended up keeping the lightweight white
quilt with a rectangle-thread pattern. I also got a darker gray blanket
to help visually anchor the bed since we aren't going to have a footboard.
Isaiah's mom already had a frame for this queen size bed that she gave
us. We put the bed on risers to help maximize under the bed storage.
 
 After making the bed, I quickly realized I was going to need a bedskirt
to hide the storage under the bed. Originally, my plan was to get another set of
the curtains so my mother-in-law could make a bedskirt to match. After searching
at about 7 different TJ Maxx stores, I couldn't find anymore of the same curtains.
So I bought 6 OTHER curtains hoping one would coordinate.  I found one to
coordinate, only to realize that I would actually need 3 curtain panels to complete
the bedskirt, and I only had 2. I haven't been able to find another yet, so it's on to
Plan C... I went to Target and bought 2 different white bedskirts. Time will tell if 
these work - I haven't been back up to the cabin since I bought them.
 
I found this accent table at Home Goods. It's a good height for a nightstand
considering the bed is 5" higher than what most beds are. Unfortunately,
we don't have room to put a nightstand on the other side of the bed
(unless we moved the bed off center of the room, which I didn't particularly
want to do either)... so I'm not 100% sure what I'm going to do on that side,
but I've got a few ideas in my head for it. But at least I didn't have to find
matching tables! AND... my sister-in-law got $20 knocked off the price by
pointing out two places that looked slightly damaged - one place was on the back
of the piece, which will never be seen. The other place was a piece of wood that
was chipped off the inside of the drawer... but the piece was actually in the drawer,
so we were able to glue it back to where you would never know! Thanks Kelly!
 
At the same time, I found this other piece of furniture. The room isn't really
big enough to have an entire dresser in it, so I like that this is a smaller piece
that complements the bedside table. And adding the same baskets to both pieces
helps to make them look more like coordinating pieces.
 
 I bought four different mirrors for our room to see which one I'd like
best... I decided to keep the one that had some color to it, but was still
pretty rustic looking.  It just went better with the furniture I have.
However, up to this point, I've only returned 1 mirror - we hung one
in the living room at the cabin, and Kelly (my sis-in-law) might use
one in her room. So that worked out pretty well!
 
 
I found these 8x10 picture frames that are a perfect match to the mirror.
While I don't love the fact that they are so completely matchy-matchy,
I decided I can't be TOO picky, and kept them. I also wish I could have
found more than 3, but I'm keeping my eyes open. Hopefully I'll get
pictures in them sooner rather than later, but I'm notoriously bad about
hanging pictures up and never putting anything in them!
 
I bought two rugs that have a woven basket look, but they are actually very
soft and cushiony! I actually wanted a runner-length rug to help soften
the room up - but Kelly and I decided that if we butt the rugs up together
and put a few stiches in to connect them, it would look like a single rug.
 
I am pretty excited about everything so far - but it still has a long
way to go!! Headboard, lights, closet, bedskirt, blinds, storage,
and some other decorative pieces are all on my to-do list.