Another bridal shower is in the books! Over the weekend,
my sister and I hosted a Garden theme bridal shower for a
family friend, Miss Samantha Yocke. It turned out better than I
family friend, Miss Samantha Yocke. It turned out better than I
imagined and is one of my favorite showers yet! My sister came
up with the Garden theme. It took some time for me to get on
board with it, but I'm so glad she talked me into it.
The invitation for the shower included the quote
up with the Garden theme. It took some time for me to get on
board with it, but I'm so glad she talked me into it.
The invitation for the shower included the quote
"Life is a Garden and Love is in Bloom."
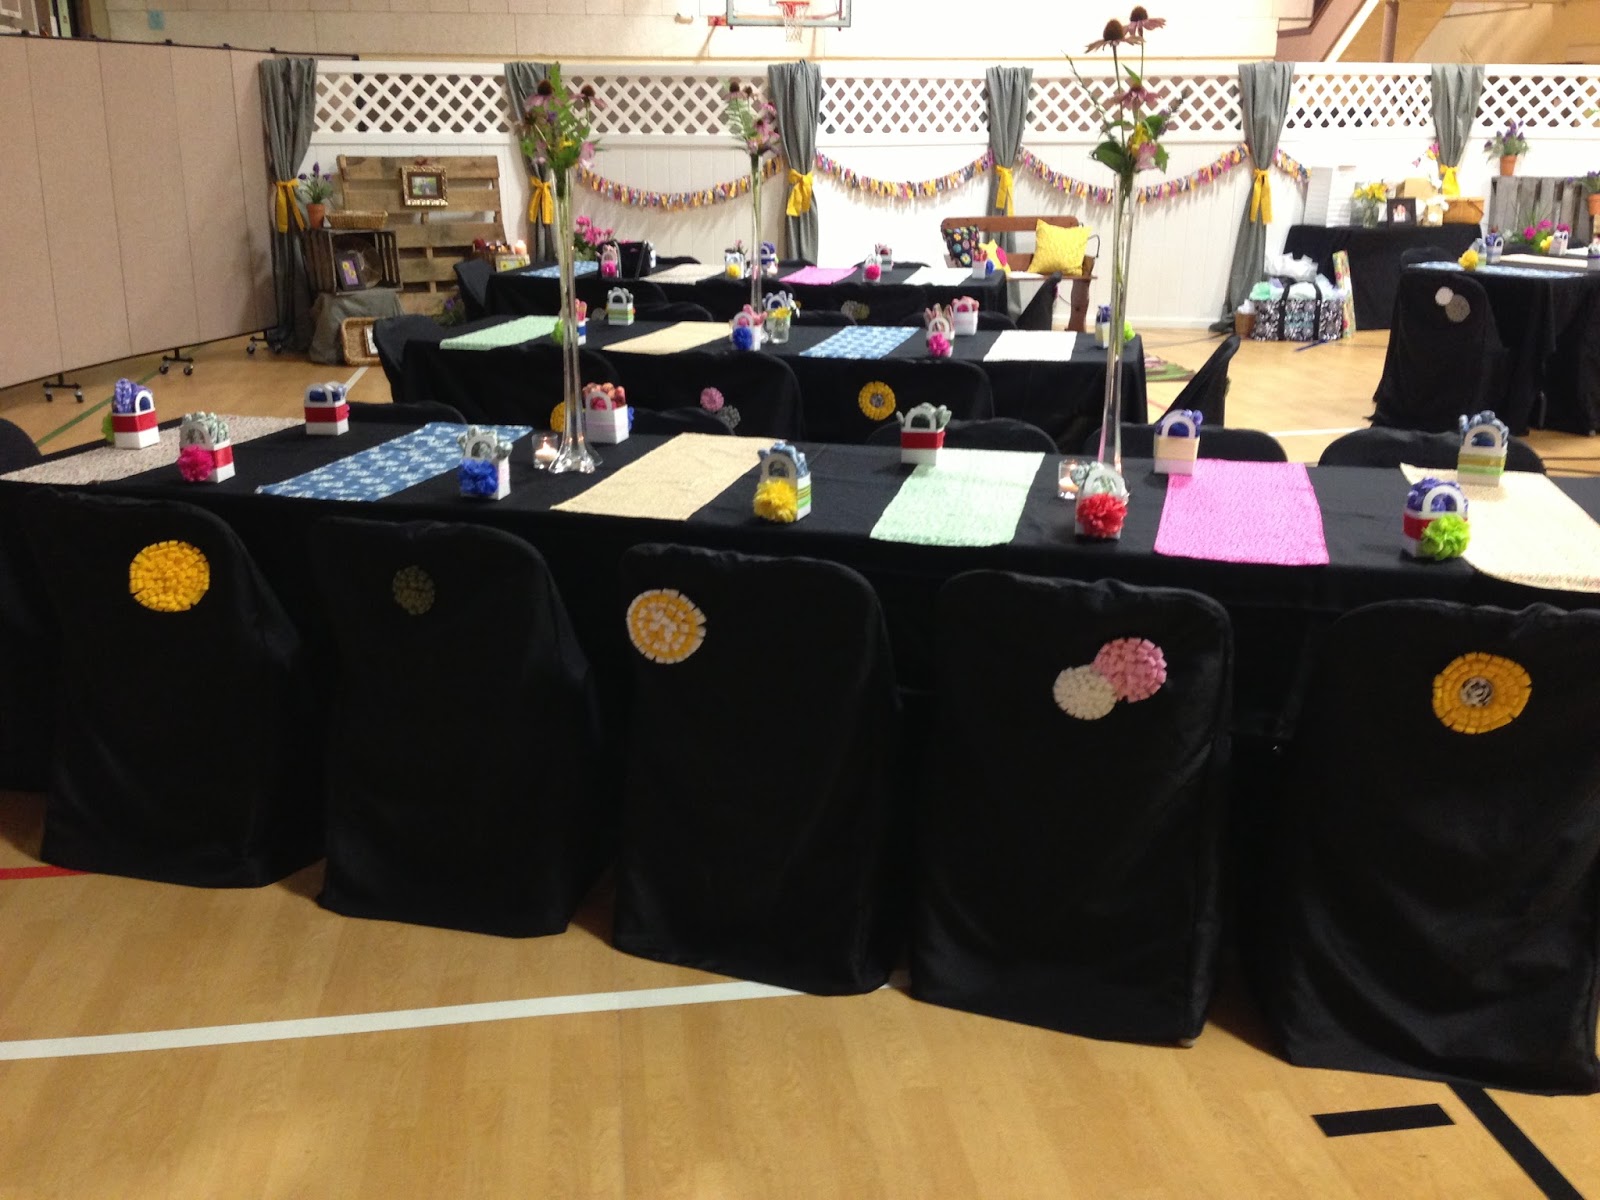
Here's a couple pictures to show the overhead view of the room:


One of the first decisions we made was the table runners. Instead
Here's a couple pictures to show the overhead view of the room:


One of the first decisions we made was the table runners. Instead
of using one long runner the length of the table, we decided to
have multiple table runners across the width of the tables.
Rebekah and my mom picked out a few different floral print
fabrics, and Rebekah made all the runners. It was time
consuming and a lot of work (for her!), but they looked great!


The centerpieces was one of the last decisions we made. We
just couldn't decide what we wanted, but in the end, we decided
that we needed to incorporate more REAL flowers in the shower,
so flower centerpieces were the best way to do this. The tall vases
are from my wedding. The mini mason jars, which are probably the
cutest little things ever, Rebekah found for FREE. Most of the flowers
came from a friend's yard (thanks Judy!), and I just bought a few purple
and yellow austemaria flowers to help complete the arrangements.


The favors at this shower may be my favorite ones we've ever done!
Gardening gloves! Perfect, right?!? We already had all the white boxes
from my sister's wedding (5 years ago!). I added a ribbon and tissue paper
flower around each box, and Rebekah arranged the gloves in them.
I ordered the gloves online for about $1 each and loved the different prints!


The felt flowers that we attached to the backs of the chair covers
were ones we already had from previous parties, but since they
worked perfectly with this theme, we just had to use them again!

I thought the present-opening area was adorable- we used a bench
that was already in the church, added three pillows (took them off our
mom's back porch), and in front, put a rug. Rebekah also got this rug for
FREE.... can't get much better than that!!! On the lattice, we hung scrap
fabric banners that Rebekah made - I love how they look!
mom's back porch), and in front, put a rug. Rebekah also got this rug for
FREE.... can't get much better than that!!! On the lattice, we hung scrap
fabric banners that Rebekah made - I love how they look!


Thankfully, we had so many people offer to help us with the shower, and
we ended up not having to do any of the food or drinks! But we knew what
we wanted done for it - a Make Your Own Garden Salad Bar. Goes with
the theme perfect, huh? The shower was at 4:00 pm, so we didn't have to
provide a dinner meal, but we still wanted to serve something pretty substantial.
So the ladies in charge of the food put together the salad and all the
fixing's and even went the extra mile and provided fruit salad, potato salad,
and pasta salad! We also thought mini dirt cakes in terracotta pots would be
adorable... we already had a bunch of the pots from a previous shower, so
we didn't have to get many more. It was a fun touch! Also, a good friend of
the bride's mother makes delicious cookies - she made wedding cake cookies
for each person to take with them - and they tasted as good as they looked!
for each person to take with them - and they tasted as good as they looked!


Behind the food table we hung pennants that had the
same quote as the invitations, along with a couple wreaths.

For the drinks, we had sweet tea, lemonade, water, and coffee. Our cups
were mason jars, tied with a scrap piece of fabric leftover from the table runners.
We added peach striped straws, which were a big hit - had lots of people ask
where we got them! (answer-Jo Ann Fabrics, but they're at Hobby Lobby too)


A big huge thank you, thank you, and thank you again to Judy Gibbs, Debi Herbert,
Kathy Vallance, Sherri Taliaferro, and Linda Brewster for all your hard work!
I'd have to say, though, probably my favorite thing about this shower were
all the display areas we made. There were six areas total. There's so many
different elements that we used in the display areas that I think
I'm just going to point them out in each different area.
The first display area was at the entrace, right inside the door where
guests would arrive. For this area, we decorated with a pallet, paper rosette
ribbons, a mason jar of hibiscus flowers on a basket, a piece of wood
ribbons, a mason jar of hibiscus flowers on a basket, a piece of wood
with the couples initials, and a sign pointing people which way to go.


The largest display area included 3 pallets, a "love" sign made out of
cardboard and moss, hot glued to the largest center pallet. There was a
water fountain, given to us by a friend of my mom's. My sister made a
mini pennant with the groom's last name that I stuck in a plantar topped
with moss. We hung some pictures on the pallets - one of the bride and
groom, and some of flowers that we dried and pressed. They turned out
so nice! We added candles, an arrangement of flowers resembling
the centerpieces, a wooden birdhouse, a tin can and a mason jar with hibiscus
flowers from my mom's yard, a moss and burlap wreath, and a wood block photo
of the couple. Some of these things were elevated by various things - a basket from
my house, an apple crate we borrowed, and a box from the church covered in fabric.
my house, an apple crate we borrowed, and a box from the church covered in fabric.


(click HERE for a tutorial on making the wood block photo)

The next display area included 2 pallets, some more pressed flowers,
candles, birdhouse, wood block picture of bride and groom, a tin
tray with purple flowers, a wooden miniature chair, and another wreath.


The third display area took some work. We knew we wanted to use this large
flower arrangement of my mom's. It needed to be elevated because of the
cascading vines, so we found a small table at the church and covered it with fabric.
We also added a small wagon with flowers (it's my mom's too) and more purple
plants in terracotta pots. But it just didn't look finished. Adding a pallet behind
the plant helped a lot. Then I grabbed a piece of scrap wood from my house, and
Rebekah used the couples initials and wrote M+S=<3. A birdhouse on the table
completed this area (all the birdhouses we used were already in the church attic!).


The fourth display area had a couple pallets, a purple potted plant from my mom's
house, more purple terracotta plants, and a picture of the place the bride
and groom are getting married. We put a large pink floral plantar next to this
area - that came off my front porch.

We like to provide the paper and pencil for the gift list. Pretty cute huh?
The pencils were already wrapped in twine, leftover from a baby shower
that some friends of ours did a while back!

The gift table just had a picture of the bride and groom, and some flowers.
We knew there would be a lot of presents, so we didn't want to have much
of anything on the table. But it needed a little something!


The last display area in the room had one pallet. We used a couple apple crates
and a fabric covered box for elevation. Here we displayed the door prizes that
we gave away... three of the prizes were chip and dip trays. They fit the theme
so well, and already came with a twine bow, so we decided not to wrap them.
The last door prize was from the parent's of the bride, and was a goodie basket
of coffee and treats. A few candles, flowers, and pictures finished this
area up, along with another pink floral plantar from my house.


The door prizes were handed out to the first person to RSVP (FYI, this is kind
of a staple at shower's we throw, because it's so important to RSVP!), the person
who had 3 flowers on the back of their chair cover, the person who brought
the 24th gift that the bride and groom opened (they picked the number), and the
winner of the game that we played.
I'm not quite sure what to call the game that we played - basically, Rebekah
and I came up with a bunch of multiple choice questions. There were 6 tables
set up at the shower, so to begin with, each table was on a team. One
person from each team was the "spokesperson," and got 3 cards each with
A, B, and C on them. The bride and groom were their own team. Rebekah
would ask a multiple choice question about the bride and groom, and each
table's spokesperson had to hold up their answer. Then, the bride and groom
would hold up theirs. If you answered wrong, you were out. After the very
first question, only two tables remained! When only one table remained (which
was only a couple questions later), the game switched to where each
individual table member got their own set of cards and were playing against
each other - and they were still out if they guessed wrong.


The questions were pretty silly ones - a few examples are:
1. What was Samantha's favorite part of Marc's proposal?
A. the location, B. the ring, or C. his creativity
2. Describe the first time Samantha and Marc met.
A. Awkward, B. Breathtaking, or C. Crazy
3. If Samantha and Marc got separated in Wal-Mart,
where is Marc most likely to be?
A. in the cookie aisle, B. in the movie aisle, or C. in the bathroom
After the game, we moved into the beginning part of the gift giving.
Rebekah and I had a gag gift for Samantha. As I read a poem,
Samantha kept opening her gift to reveal what the poem was
describing, and Rebekah would hang them up... so here's the poem, partially
from websites, but mainly written by our dad of all people! HAHAHA!
 PANTY POEM:
These undies are to last you all throughout your life
And Marc will be pleased to say, he has a sexy wife.
So listen up to hear about your lifelong panty plan
This underwear, we have no doubt, will last your whole life span.
The first are for your wedding day, of course they are pure white.
We know that Marc will shout "Hooray!" when he sees you on that night.
The next are for your honeymoon, they're sexy and all lace
But we hope you'll leave your room, 'cause Jamaica's a gorgeous place!
On Valentine's Day you'll wear this pair before you hit the bed
'Cause Cupid's arrow in the air shoots tushies that are red.
After a year has passed you'll face anniversary number one
With these you'll surely have a blast 'cause leopard's so much fun!
When year five comes rollin' in, don't worry, don't you fret
You'll still be young and beautiful; this bikini is your best bet.
Then when the time is right, and don't be saying, "maybe"
You'll wear your little pink or blue in honor of your baby.
When ten years pass, they will fly by; the flame will still be burnin'
This two-tone pair will light the fire, that's for sure and certain!
When your years together become 25, things sag and turn to cellulite
Please don't panic, just put these on, these Spanx will hold it all tight!
When finally you're old and gray, with these you can't go wrong
'Cause sorry Sam, but at that age, you just can't wear a thong!
The time will come, a long way off, when panties just won't do
The bladder just won't hold it all, so these Depends will work for you!
Life is truly an uncertain thing, you might live in a mansion or shanty
But one thing for sure you know, you'll have a lifetime span of panties!

We just loved doing this shower, but even more, we love the bride and
her parents! They are a wonderful family and we were so glad to get to
throw this shower for them! And the groom was very precious - I can
tell that Miss Samantha Yocke is going to be well taken care of by him!
Aren't they so cute together?!?

And the VERY BEST part of throwing showers is
getting to spend more time with my sister!!!