CLICK HERE FOR FREE BLOGGER TEMPLATES, LINK BUTTONS AND MORE! »

Monday, December 19, 2011

Christmas Punch

Here is the recipe for a delicious and festive Christmas punch!
I usually take this to Christmas parties that I go to, and I
always have lots of people asking for the recipe.... it's so
easy, that you really just HAVE to try it!

Two 2 liters of Ginger Ale
1 can of Frozen Lemonade
Green and Red Maraschino Cherries, drained
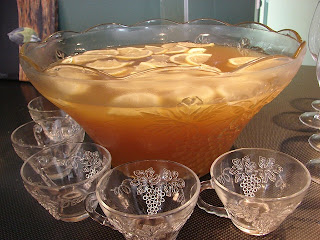
**Optional-the picture above shows sliced fruit as a garnish**

Pour all ingredients in a large punch bowl.
Freeze over night. Thaw for a couple hours before
serving.  I usually serve the punch while it's still slushy
and icey... but it's still good when it's completely thawed.

Hope you have a blessed holiday... and don't forget
why we REALLY celebrate CHRISTmas!! God bless!

Friday, December 16, 2011

**Christmas Cards 2011... and 2010**

I love getting photo Christmas cards from people,
so I decided when I got married that I would send
photo Christmas cards too =) I wanted to share this
year's Christmas card with y'all... and throw in last year's
card too.  Here's the front and back of the cards:
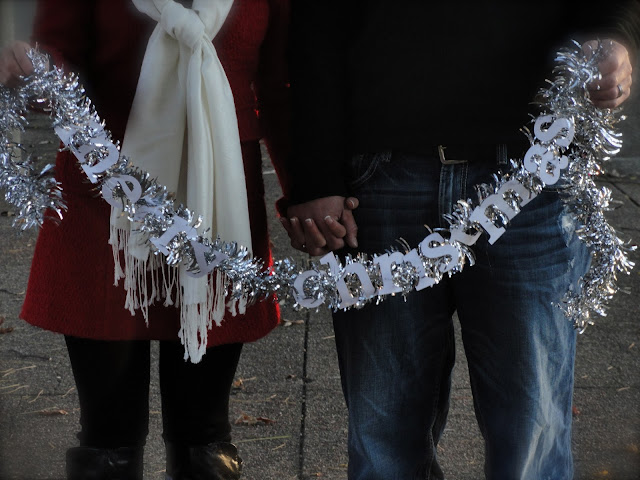
I bought silver tinsel garland and used a cricut to cut
out the letters, and then just hot glued them to the garland.
My sister, Rebekah, took the pictures one day when
Isaiah and I went to visit her (and her hubbie) in Louisville, KY.
We went to a local park and Rebekah just started clicking away.
It was pretty cold, so we didn't stay outside for long!
And Isaiah was such a good sport about it!!
The same evening, we uploaded the pictures to Vistaprint.
I choose an oversized postcard.  Since the garland said
"Merry Christmas," I didn't feel like it was necessary to have
the design of the card say something as well.

Here's some other pictures from that day:


AND... here's the silly pictures when we needed
to have a little fun!!


This yawn meant I was TIRED and DONE!
But it really was fun and took less than an hour.
Thanks sis for taking, uploading, and editing
the pictures for my Christmas card!!
And here's our Christmas card from 2010... since we got
married earlier that year, I decided to use a wedding picture.
This was a Vistaprint creation too....


Hope you have a wonderful Christmas!
God bless!

Thursday, December 15, 2011

DIY Mesh Ribbon Wreath

While shopping at AC Moore one night, I saw
these mesh ribbon wreaths that I thought were really pretty -
but they were $60 and $70 each! After inspecting them
a little closer, I decided I could do it myself.  So here it is!!

 So... I bought a green garland wreath for $4 and this gold mesh 
stuff, that I'll call "ribbon" that was originally $10, but of course,
I used a coupon. There is a ton of ribbon on the spool, so it can be
used for multiple wreaths.  I also went to the Dollar store and
bought 10 clusters of round ornaments. With these items, plus my hot
 glue gun, I was set. **Just so you see the size of the mesh ribbon,
here's a stock image of it, in red**

This was SO easy - I couldn't believe anyone would charge (or pay!)
$60 for a wreath like this... All you do is gather about 10-12 inches
of ribbon, push it together, and use a piece of the garland on the wreath
to hold it down.  I have made two of these wreaths and did 6 sections on
one wreath, and 5 sections on another.  I like 6 sections better than 5.

Once the mesh ribbon sections were secure, I placed the cluster
ornaments between the mesh ribbon section, and on the inside and the
outside of the wreath. I also used a few leftover ornaments that
I had laying around to fill in some gaps where I didn't need to use
a whole cluster, but wanted a little something.  I hot glued all of these
in place.  You'll want a high temp glue gun for this.

The picture above is of the 5 section wreath. I left the inside of
this wreath plain, but you can always hang something from the middle.
On the other wreath I made with 6 sections of ribbon, I added a
snowflake ornament - I just hung it on a piece of the green garland. 

The color combinations and the variety of things you can add to
this kind of wreath are endless =) Hope you enjoyed this post... 
Next, I hope to share my Christmas cards with you!


DIY Ornament Wreath

I recently made my first ornament wreath and I absolutely love it!
It's super simple to do, but just takes a little bit of time.

I started out with a green garland wreath from AC Moore,
it was on sale for about $4.  The one I got was a 24" wreath. I spray
painted the top and sides silver, just in case there would be any gaps
between the ornaments (and there was, so I suggest not skipping this step!).  I
bought a variety of round ornaments from the Dollar Store - it takes more
ornaments than you think - I used over 100! I made a mess in my house for
a couple days, but it was definitely worth it.


Remove the hardware from the top of the ornaments. Using a high temp glue gun, 
hot glue medium size ornaments along the inside of the wreath. Then, hot glue
 large ornaments around the outside of the wreath. Fill in the rest of the wreath
with all the different sizes. You probably won't be able to glue all the ornaments
to the wreath itself, and will need to glue many of the ornaments to each other. 
AND... Voila! You have a beautiful custom wreath.

Hang it on your front door, or on a mirror, like I did.
You'll be glad you made this wreath - it's so festive and stunning!


I've made another kind of Christmas wreath and hope to
post it soon.  Have a wonderful day and God bless!