CLICK HERE FOR FREE BLOGGER TEMPLATES, LINK BUTTONS AND MORE! »
Showing posts with label Halloween. Show all posts

Thursday, October 31, 2013

Beak's Halloween Party

My sister helped throw a Halloween party over the
weekend for her small group at her church... and I
love everything that they had! It looks "spook-tacular"!
 
Here's the invite she sent out... I love the fonts!!
 
They served TONS of food (no tricks, all treats!) and
labeled everything a gruesome or scary name... so creative!


The tables were decorated simple but so cute....
the centerpieces were made just by printing a picture
on computer paper, cutting it to size to fit in the glass
vase, and then put a flameless candle inside.
This first picture you can't tell how it glows, but scroll
down and you'll see! It looks amazing!

 
My sister looked so cute... she made a parrot costume out of
feather boas! She wanted to kind of coordinate with her husband,
who doesn't really like to get all costumed up, but went as a pirate
I think it's cute that Rebekah was a parrot and her nickname is BEAK =)
 
And this is one of my favorite costumes that was there....
Mr. and Ms. Pacman! They won the prize for the most creative =)
 
 Great party sis! I wouldn't expect anything less from you =)
It definitely looks like everyone had a great time!! 

Happy Halloween everyone!!

Wednesday, October 30, 2013

Halloween Decor... & Some Pumpkin Painting

This is the first year I've ever put out
any fall/Halloween decorations INSIDE my
house... I didn't go all out or anything, but
I really like the little bit that I did! It's a good
start anyways, and I think I'll just keep adding
to it each year, because I kinda like it!  
 
I already had the black stands and orange burlap.
I found the candle at Marshall's, and the owl and
pumpkins came from Big Lots! I couldn't believe
what cute stuff they had there!! While I like everything
that's on the table, I still think it's missing something...
But at this point I will just wait til next year to add to it.
I really like the mixture of the white, silver and black items.
 
I found this cute little towel at Target for $1... you can't
get much better than chevron and polka dot pumpkins!
 
For one of the guest bathrooms, I found
this adorable hand towel from Target.
The glittery pumpkin is also from Big Lots.
And this is one of the printables that I shared
last year (click HERE). I'm loving it!!

The second guest bathroom is decorated more for fall than
for Halloween... and I only just added a multi color pumpkin
(another find from Big Lots). It's the same colors that the bathroom
is done in, so it really looks perfect in there. I like it =) 

So that about sums up the inside decorating that
I did this year.... not a bad start, right?!?
 
The rest of this doesn't have anything to do with decorating,
but I'm adding it because it all happened around the same time.....
 
We had some friends over for Sunday lunch a couple weeks
ago. I grabbed plates, napkins, and cups from Target for $1
each, and the bowls and straws from the dollar store.
 
I borrowed this burlap pennant from our church (one of the
many random but useful things that I'm glad was donated
to the church...  instead of just throwing it away).
 
I made potato soup (click HERE for the recipe) & cheesy
crescent rolls. One family brought delicious pumpkin
 pie, and another family brought appetizers - pepperoni
chips, perogies, and sausage dip/chips! Yum Yum!
 
There were four kids that came over with their parents,
so I got the supplies for the kids to paint and decorate their
own pumpkin. It entertained them and was a really easy
setup... I got a couple plastic tablecloths from the dollar store
and put one on the floor and one over the table. I set out
paint, eyeballs, poms, glitter, and glue and let the kids have at it!
 
They had fun and so did I.... but the pumpkin I painted ended
up looking more like an Easter egg... wrong holiday, Rachel.
 Happy Halloween!!!

Friday, October 18, 2013

"BOO" Halloween Wreath

I LOVE LOVE LOVE my new Halloween
wreath!! I only have one other Halloween
wreath (click HERE to see) and I've used it the
past couple years. So I knew I wanted to do
something different this year. I'm so happy
with how it turned out!!! What do you think?!? 
 
Here's the supplies I used. I found the spider at the
dollar store!! Also, not pictured is black paper and
yarn, as well as a hole punch and hot glue gun
 
The spray paint is Pumpkin Orange, and I ended up
using the entire bottle on the wreath. It took a few coats
to get all the crevices. I love how scraggly this wreath is too!!

 
I already had the burlap pennant triangles, so all I had to
do was cut out black letters and glue them on the burlap.
I hole punched each triangle four times and strung black
yarn through it, then tied the yarn around some of the twigs.
In all honesty, the pennant is a little bigger than I would
prefer, but I already had it and didn't feel like messing with
it to make it smaller, so I left it the way it was.
 
I hot glued the spider, and then added a black/white striped
ribbon to finish it up. I think it's so stinkin' cute!!!!
 
Hopefully the giant fake spider won't attract
REAL ones... Happy Halloween!!


Saturday, October 27, 2012

Thumbtack Monogrammed Pumpkin

I saw the idea of decorating a pumpkin using thumbtacks on
Pinterest last year and didn't get around to making one then, so I
just HAD to do it this year! And I'm so glad I did, because I love it!

I just wanted a simple monogram ("H" for my last name). Of course,
the easiest way to do this would have been to print the letter from the
computer, but I wasn't really thinking about the most efficient way to do
things.... but I'll tell you what I did.  I had a wooden H that was curvy.
I traced the H onto newspaper and cut it out.
I just placed the newspaper on the pumpkin, and attached it with thumbtacks
to keep it in place.  I completed one section at a time, and had to overlap the
thumbtacks in order to completely cover all the newspaper.
It was a very simple project - the hardest part was finding silver thumbtacks!
I went to 3 different stores before I found what I needed at Michael's!
This size letter took about 200 thumbtacks. If I had to do it over again, I would
have started the letter lower on the pumpkin. Sitting right in front of it, I thought the
letter was low enough, but when it's sitting on the ground, it's a little too high on the
pumpkin for my liking.  But regardless, it's still adorable, and I love that I can keep it
on my porch well past Halloween and on into the Thanksgiving season!

Wednesday, October 24, 2012

Halloween Candy Tags

Every year at Halloween, it seems like half the town comes to my
neighborhood to go trick-or-treating... I'm not exaggerating when
I say we get HUNDREDS of kids! So I decided that I should make
passing out candy an evangelistic outreach as well.

Last year, I put 4-5 pieces of candy in a plastic baggie, along with a
comic book tract that our church supplied. I had prepared 250 of these
baggies, and was out after the first hour! It was an expensive Halloween....

So this year, I decided to get various kinds of suckers to pass out. I bought 450
suckers, so I hope that lasts the whole night- but I am taking a cue from my neighbors
and only giving one piece of candy per kid this year! Anyways, I found this super cute
Halloween scrapbook paper.... on sale!!! 
 
I printed tags on the computer on the more plain side of the paper.
I just used a simple phrase that another group from our church uses
anytime they pass things out for free..... so the tags say:
This candy is FREE....
Just like God's LOVE!
Happy Trick-or-Treating!!

The suckers slide onto the tags after they are hole punched at the top and
bottom. It's a pretty simple way to remind people of God's unfailing love, and
how easy is it to accept God's love, just like it's easy to accept free candy =)

And of course, I had to have something Halloween-ish to put the
candy in, and this black cauldron works perfectly!

Have a fun but safe trick-or-treating next week!!
 
P.S. Thanks to my mom and sister for helping me print, cut, and
hole punch these! It was a much faster project with y'all's help!!

Wednesday, October 19, 2011

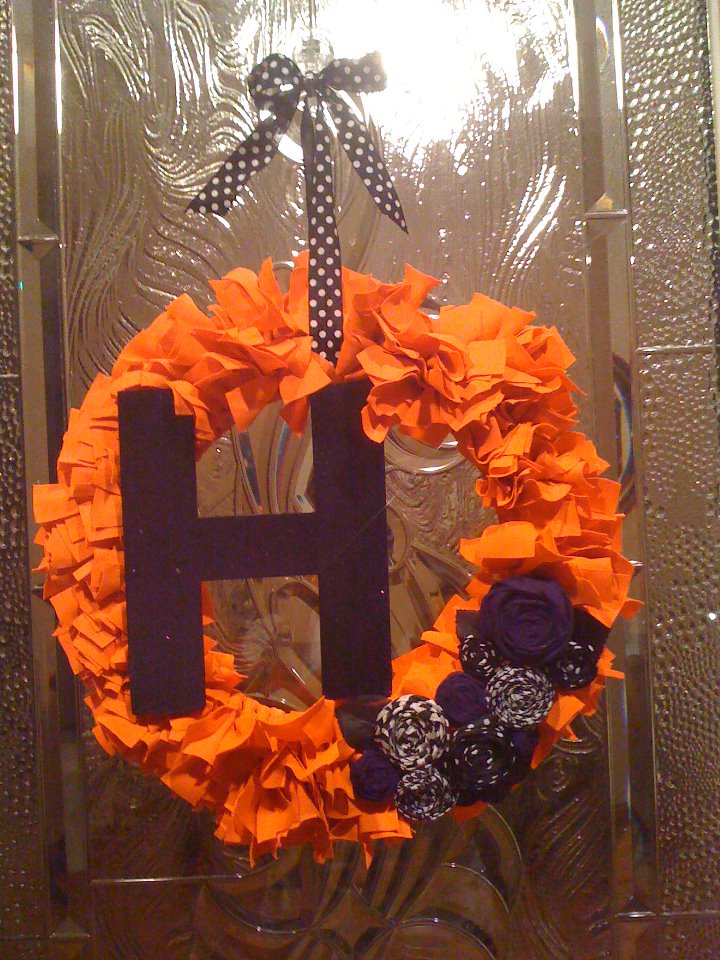
Halloween Wreath 2011

I wanted to share the Halloween wreath I made this year - it was such
an easy craft - if you still need a wreath, it's not too late! You can
make this and have it up in time for Trick-or-Treat =)

I already had an orange fabric remnant that my sister saved from
being thrown away.  And I had various black and white ribbons -
zebra print, houndstooth, and polka dot.  I also had an "H" initial
that was used in a sign for a party that I threw a couple months ago.
I thought it would be perfect since it can stand for both "Haynie" (my
last name) AND "Halloween!"  I decided that since I already had a
 good start for the makings of a wreath, I may as well get the
other couple of items that were needed to do it.

I bought a small 4 layer wire wreath from Hobby Lobby - with a 40% off coupon!
It's already inexpensive, but I like to save money every chance I get =)
I cut a ton of strips of the orange fabric, about an inch wide and about
6 inches long.  The strips don't have to be exactly the same, so just eyeball it
when you are cutting.  Or if the fabric allows, you can tear it. Fold the strip in
half, and loop the folded end around 2 of the wires. Put the loose ends
through the folded end, and pull tight.  Repeat this process over and over.
I looped the 2 wires on the left, then the 2 wires on the right, then the 2 wires
in the middle, AND REPEAT.  It's a little time consuming... I think I watched
Kim Kardashian's Fantasy Wedding while I did this project =)


When you are finished tying the strips all the way around, you may need to trim
the wreath if some strips ended up being too long.  This is a simple, quick step =)
The back of the wreath should look like this:

To make the rosettes, I tied a knot at the end of the ribbon. Then turn, twist, 
and roll the ribbon around and around.  You can hot glue every once and
a while to secure the rosette.  Once the rosette is the size you want, just
cut the ribbon and glue it down. 

After I made the rosettes using my black and white ribbon pieces,
I decided it needed more color.  So I bought a purple fabric remnant, cut
it in strips, and did the same thing. 


I also bought a fake black rose (at the dollar store) that had black leaves
attached to it.  I took the leaves off to add to my wreath.  I think the wreath
would have looked fine without it, but oh well. 

I find it helpful to arrange the rosettes on the wreath as you are making them so
you know whether you need to make a small, medium, or a large rosette, and so you
can decide what color rosette you need to make next.  Once you are satisfied with
the rosette and leaf placement, then it's time to glue.  I leave everything in place,
and hot glue each item one at a time, working from the top of the cluster down.
I personally like the leaves to come from under the rosettes, so I glue the leaf first.

The "H" initial that I already had was painted gold shimmer from a previous
party.  I figured I would use the gold H again, possibly around Christmas time,
so I didn't want to paint over it.  The good thing about H's is that I could flip it
over and use the backside, and it's still an H =)  So I painted it black. It
didn't really give the look I was going for, so I put purple glitter glue over
the black paint.  I had to do about 6 coats of this to get the amount of
sparkle that I wanted, but at least it was fast drying.


Since I didn't want to ruin the gold shimmer side of the H, I couldn't
hot glue the H to the wreath.  Instead, I tied fishing line around the H in
two places, and tied it to the wreath.  It's not very noticeable, and it
does the job of holding the H in place.


Then, tie a ribbon at the top of the wreath, and it's done!!
Hope you have a great week!! God bless =)