CLICK HERE FOR FREE BLOGGER TEMPLATES, LINK BUTTONS AND MORE! »

Monday, October 24, 2011

"The Perfect Pair..." A Shoe Themed Bridal Shower

One of my FAVORITE bridal showers of ALL TIME....
"The Perfect Pair!" I got this idea from a-friend-of-a-friend...
and ran with it! First of all, this theme fit the bride-to-be perfectly.
Her name is Jerica and I don't know anyone who loves shoes MORE!
This shower was thrown in October of 2010. Aren't the invitations PERFECT?!?
Head over heels in love =)  *Contact info was removed from this invite*
The main way that the "shoe" theme was incorporated was by
providing a box lunch, IN shoeboxes.  Since the shower was during
lunch time, a box lunch was appropriate.  I ordered the shoeboxes
(here), and although it was a pretty big expense, it was well
worth it!! Since the bride's favorite color is pink, we used a mixture
of pink's, black, and white in our color scheme.

Each box lid was tied with a coordinating ribbon over top a napkin and
utensils, and inside the boxes were chicken salad sandwiches, fruit,
homemade chex mix, a cute cupcake, and a cup for their drink.
**Note: if you decide to do this, line the box with tissue paper first
to help keep the boxes from getting too messy on the inside. **


We set up a drink table with pitchers of pink lemonade embellished with
limes, as well as water.  My sister, Rebekah hand painted and decorated
the shoes that were hung over the drink table... isn't she so talented?!?


Since the tables already had so much on them with the boxes, we
didn't really need much for centerpieces.  BUT we used some tall
skinny vases with pink austemaria flowers just to give the tables
some height.  On the round tables, we used larger vases that had
hand painted shoe signs (by Rebekah, again).


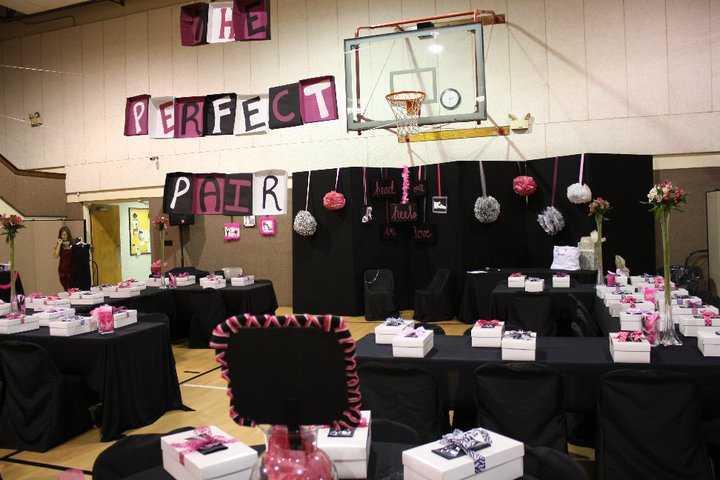
In the picture above, you can see "The Perfect Pair" sign that
Rebekah made (which we made my husband hang from the ceiling).
You can't really tell from this picture, but it looked like it was painted
 on shoe box lids (it was really lids from envelope boxes, but who cares?!?)
The sign said "The Perfect Pair" on BOTH sides - so cute, right?
We also started a craze with our friends by making tissue paper balls as
extra decor.  Such a simple, inexpensive project that makes a lot of impact!
See the tutorial here. Here's a couple views of the whole room:


We wanted to have a cute backdrop for Jerica to open her presents, so
we duplicated the invitation.  I love it that we used different ribbons (and
a boa!) to hang each sign... it turned out **perfect.**
Also, a party isn't complete without background music - we chose fun songs,
like "Girls Just Wanna Have Fun" and "Wishing, Hoping, Thinking & Praying."


For the favors at this shower, we bought mini nail polishes in various
shades of pink, tied a skinny black bow around them, and put them in
a cute hat box.  The door prizes were baskets of various things for your
feet/legs (razors, lotion, etc.) but also a few things that were just pink.


One game we played was to guess how many shoes Jerica owns, as well
as how many shoes the groom (Brandon) owns.  We had both of them
count ahead of time so we would know. A door prize was given out
to the person who guessed closest for the bride and for the groom. 
A couple weeks after the shower, Jerica realized she forgot to count
her winter boots that she hadn't gotten out of storage yet... oops!!


The other game we played was the Highest Heel Contest...
I haven't blogged about it yet, but we played this game at my personal
shower, which was about nine months before this one.  Since there was
quite a bit of time between them, and only a handful of people were at
both parties, we decided it was ok to duplicate the game.  Plus, how could
we NOT do this game, when it goes perfectly with the theme?!? 


The fourth door prize went to the person who had a pink feather
boa remnant in their shoebox lunch.  I like the idea of someone
winning a prize based solely on pure luck =) 

This was one of my absolute most FaVoRiTe showers to throw -
Thanks to Beth Calvert and her daughters, Kemble Ruff
and Kitty Hurdle for all their hard work and help.  And, of
course, my sister and mom.  It was definitely a group effort! 
Here's a picture of the party planners and the bride....


AND... just because I LOVE this picture..... here's the
bride's shoes that she wore to the shower - now
you understand why this shower was perfect for her!


Have a great day, and God bless!!!

Wednesday, October 19, 2011

Halloween Wreath 2011

I wanted to share the Halloween wreath I made this year - it was such
an easy craft - if you still need a wreath, it's not too late! You can
make this and have it up in time for Trick-or-Treat =)

I already had an orange fabric remnant that my sister saved from
being thrown away.  And I had various black and white ribbons -
zebra print, houndstooth, and polka dot.  I also had an "H" initial
that was used in a sign for a party that I threw a couple months ago.
I thought it would be perfect since it can stand for both "Haynie" (my
last name) AND "Halloween!"  I decided that since I already had a
 good start for the makings of a wreath, I may as well get the
other couple of items that were needed to do it.

I bought a small 4 layer wire wreath from Hobby Lobby - with a 40% off coupon!
It's already inexpensive, but I like to save money every chance I get =)
I cut a ton of strips of the orange fabric, about an inch wide and about
6 inches long.  The strips don't have to be exactly the same, so just eyeball it
when you are cutting.  Or if the fabric allows, you can tear it. Fold the strip in
half, and loop the folded end around 2 of the wires. Put the loose ends
through the folded end, and pull tight.  Repeat this process over and over.
I looped the 2 wires on the left, then the 2 wires on the right, then the 2 wires
in the middle, AND REPEAT.  It's a little time consuming... I think I watched
Kim Kardashian's Fantasy Wedding while I did this project =)


When you are finished tying the strips all the way around, you may need to trim
the wreath if some strips ended up being too long.  This is a simple, quick step =)
The back of the wreath should look like this:

To make the rosettes, I tied a knot at the end of the ribbon. Then turn, twist, 
and roll the ribbon around and around.  You can hot glue every once and
a while to secure the rosette.  Once the rosette is the size you want, just
cut the ribbon and glue it down. 

After I made the rosettes using my black and white ribbon pieces,
I decided it needed more color.  So I bought a purple fabric remnant, cut
it in strips, and did the same thing. 


I also bought a fake black rose (at the dollar store) that had black leaves
attached to it.  I took the leaves off to add to my wreath.  I think the wreath
would have looked fine without it, but oh well. 

I find it helpful to arrange the rosettes on the wreath as you are making them so
you know whether you need to make a small, medium, or a large rosette, and so you
can decide what color rosette you need to make next.  Once you are satisfied with
the rosette and leaf placement, then it's time to glue.  I leave everything in place,
and hot glue each item one at a time, working from the top of the cluster down.
I personally like the leaves to come from under the rosettes, so I glue the leaf first.

The "H" initial that I already had was painted gold shimmer from a previous
party.  I figured I would use the gold H again, possibly around Christmas time,
so I didn't want to paint over it.  The good thing about H's is that I could flip it
over and use the backside, and it's still an H =)  So I painted it black. It
didn't really give the look I was going for, so I put purple glitter glue over
the black paint.  I had to do about 6 coats of this to get the amount of
sparkle that I wanted, but at least it was fast drying.


Since I didn't want to ruin the gold shimmer side of the H, I couldn't
hot glue the H to the wreath.  Instead, I tied fishing line around the H in
two places, and tied it to the wreath.  It's not very noticeable, and it
does the job of holding the H in place.


Then, tie a ribbon at the top of the wreath, and it's done!!
Hope you have a great week!! God bless =)


Thursday, October 13, 2011

Barbie In A Box Halloween Costume

Halloween is right around the corner, so I thought I would share with
you THE best Halloween costume I've ever worn.... Barbie in a Box!!


My twin sister (Rebekah) and I got invited to a Halloween bridal shower
last year (2010). We really wanted to have a cool costume and knew that
everyone else would be dressing up too. We had planned all along on
another costume, and then less than a week before the shower, I came
across this idea.  Here was my inspiration:


 I knew we just HAD to do this!!!  My parents had a couple leftover
moving boxes that were used for hanging clothes.  They were the perfect size,
and they gave them to me.  I do have to admit, my husband did most
of the difficult work - I told him what I wanted and he figured out the best
way to do it, while I "assisted."  I know it involved gluing the boxes together,
then cutting out the hole for the front of the box, as well as cutting the
bottom of the box so we could walk with it. He also made "handlebars" so
we had something to hold on to while we were inside the box. And he attached
shoe boxes to the back of the box so we could rest against them but still
stay forward. For more detailed instructions, click here


I painted the outside of the box Barbie doll pink, and the inside lime green.
When Rebekah came in town the day before the shower, she hand painted
all the "details" and even surprised me by painting a UPC code - how funny!
We glued a clear shower curtain on the inside of the box to represent the
plastic on a real Barbie doll box. What do you think?!?


Rebekah also made a guitar out of cardboard, paint, and ribbon.  We made
my microphone using a paper towel roll, styrofoam ball, paint, and glitter.
Of course, we had to name our Barbie dolls =) Bridgette and Brooklyn...


 We bought the blonde wigs for about $5 each at Wal Mart, and bought fake
eyelashes,  but everything else we wore, I'm kind of embarrassed to admit.... I
already owned!! We drew Ken tattoo's on our wrists (while driving to the shower).  
All in all, we spent less than $20 total on this costume.... for the wigs, fake
eyelashes, paint, and the shower curtain.  Everything else, we already had. 
We spent a lot of TIME on it, but it was worth it!!!


By the way.... we won "Most Creative" costume at the Halloween bridal shower =)
Gotta say "THANKS" to my husband for all his help... maybe I should
call him "Ken"...?!?  Happy Halloween... and God bless!!